


Gluten-Free Recipes for For Kids
Gluten-Free Sweet and Sour Chicken
January 2, 2025Craving takeout sweet and sour chicken? This gluten-free version of the popular Chinese dish is sure to satisfy your tastebuds and stomach.
This recipe is courtesy of our friends at the Gluten-Free Palate.

Ingredients
Yields 8 servings of 1 cup
- 1 pound chicken breast
- 2 Tablespoons soy sauce (labeled gluten-free, or substitute tamari or coconut aminos)
- 4 teaspoons dry sherry
- 1 teaspoon sesame oil
- ¼ teaspoon salt
- ¼ teaspoon pepper
- 2 Tablespoons and ½ teaspoon sugar, divided
- ¼ cup all-purpose gluten-free flour
- ⅓ cup and 1 Tablespoon corn starch
- 1x 20-ounce can pineapple chunks—keep the juice! Do not drain
- ½ cup ketchup
- ¼ cup white vinegar
- 1 cup and 1 Tablespoon canola oil (or you can substitute in preferred oil)
- 4 slices fresh ginger (peeled)
- 1 bell pepper, cut into 1-inch squares
- 1 medium yellow onion, cut into 1-inch chunks
Sweet and sour chicken is generally served over white rice, but feel free to substitute brown rice or rice noodles. Try garnishing your final plate with sesame seeds and thinly-sliced green onions.
Instructions
- Cut the chicken breast into 1-inch cubes. In a bowl, combine the soy sauce, sherry, sesame oil, salt, pepper, and ½ tsp of the sugar. Mix until combined. Add the chicken and marinate for 10 minutes.
- In a separate bowl, combine ¼ cup of flour and ⅓ cup corn starch.
- Transfer the cubes of chicken to the flour mixture and stir until the chicken is evenly coated. Set the bowl with the chicken marinade aside—you’ll use this sauce later!
- Drain the pineapple juice into the marinade bowl. Add the ketchup, vinegar, 2 Tbsp sugar, Tbsp cornstarch, and mix together with the reserved marinade. This is your sweet and sour sauce.
- Heat 1 cup oil in a large flat bottom wok until is hot—but don’t let it heat to the point of smoking.
- Add half the chicken, spreading the pieces so they cook evenly. Cook for 2-3 minutes until they begin to brown. Turn them over carefully for another 2-3 minutes or until completely brown. Once browned on all sides, transfer to a paper towel-lined plate. Repeat until all the chicken is cooked.
- Carefully drain the oil from the pan. Tidy up the wok by removing any leftover bits of chicken and breading, then return it to high heat.
- Add the remaining Tablespoon of oil and the ginger slices. Stir fry for about 15 seconds, then add the bell pepper and onion, stir-frying for 2-3 minutes. Next, add the pineapple chunks and cook for 1 minute. Add sweet and sour sauce (marinade) to the wok. Bring the mixture to a low boil, stirring until it starts to thicken. Finally, add the cooked chicken and continue to cook for another 2-3 minutes.
- Serve hot on a bed of white rice.
TAGS: LUNCH, FOR KIDS, DINNER
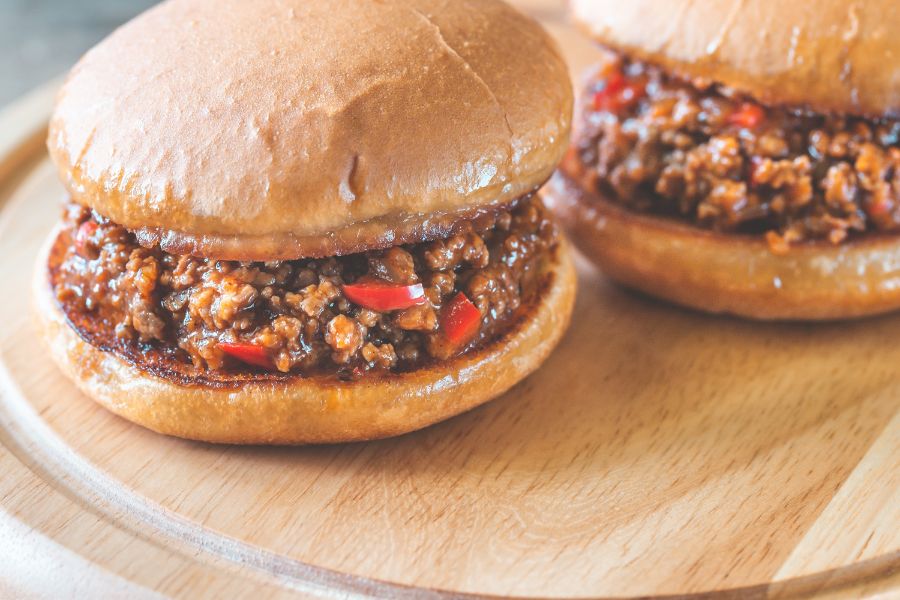
Gluten-Free Sloppy Joes
May 10, 2024Sloppy Joes are an American classic. A loose mixture of beef, tomato sauce and onions all on a soft bun makes for a delectable (and yes, somewhat messy) dish! Make it for a summer potluck and adjust the seasoning to your taste.
This recipe was provided courtesy of our friends at the Gluten-Free Palate.
Ingredients
- 1 pound ground beef
- 2 Tablespoon olive oil
- 1 teaspoon salt
- 1 teaspoon black pepper
- ½ white or yellow onion, chopped
- ½ red bell pepper, chopped
- 1 Tablespoon minced garlic
- Tomato mixture:
- 1 15oz can diced tomato
- 2 Tablespoon tomato paste
- 1 teaspoon chili powder
- 1 teaspoon cumin
- 1 teaspoon salt
- 1 teaspoon black pepper
- Gluten-free hamburger buns
- Cheddar cheese, for serving (optional)
Instructions
- Heat a large skillet over medium heat, then drizzle with the oil and add the beef. Season with salt and pepper and cook until you don’t see pink anymore.
- Add the onion and red bell pepper and stir to combine. Cook for an additional several minutes or until the vegetables are tender.
- Add the garlic and cook for another minute.
- Add the tomato mixture of canned tomato, tomato paste, chili powder, cumin, salt, and pepper. Stir to combine and cook for an extra minute or two until everything is well combined and cooked.
- Remove from the heat and serve over the gluten-free buns.
- If you want a studier, cripsy bun, try toasting them in a pan or in a toaster before serving with meat.
TAGS: LUNCH, FOR KIDS, DINNER, DAIRY-FREE
Gluten-Free Teriyaki Chicken
April 1, 2024This sweet meat dish is always a crowd pleaser. For a full meal, stir-fry broccoli and snow peas for a serving or two of vegetables and have it all with a bowl of rice.
This recipe was provided by the Gluten-Free Palate.

Ingredients
Yields four servings
- 1 ¼ – 1 ½ lb boneless skinless chicken breasts, cut into 1-inch pieces.
- 1 Tablespoon olive oil (or oil of choice)
- ¼ cup (gluten-free) soy sauce or Tamari sauce
- ¼ cup water
- 2 Tablespoons packed light brown sugar
- 1 Tablespoon rice vinegar (or white vinegar)
- ¼ teaspoon toasted sesame oil
- 2 teaspoons peeled and minced fresh ginger
- 2 teaspoons peeled and minced fresh garlic (about 2 cloves)
- 1 teaspoon onion powder
- 2 teaspoon cornstarch
Instructions
- In a small mixing bowl whisk together all the ingredients except the chicken and olive oil.
- Heat oil in a 12-inch non-stick skillet over medium-high heat.
- Cook the chicken over medium heat until brown and the internal temperature reaches at least 160°F.
- Add the sauce to the cooked chicken and continue to cook and toss until the sauce thickens, about 1 minute.
- Serve warm garnished with green onions or sesame seeds.
TAGS: LUNCH, FOR KIDS, DINNER
Gluten-Free Gingerbread Cookies
December 5, 2023Gingerbread, a holiday classic! Use this gluten-free recipe, courtesy of our friends at the Gluten-Free Palate, to make celiac-safe gingerbread houses and gingerbread people. Decorating the cookies will be almost as enjoyable as eating them!

Ingredients
Gingerbread dough
- 3 cups 1 to 1 gluten-free flour
- 2 teaspoons ground cinnamon
- 2 teaspoons ground ginger
- ½ teaspoon ground cloves
- ½ teaspoon ground nutmeg
- ¾ teaspoon baking soda
- ½ teaspoon salt
- ¾ cup butter, room temperature
- ½ cup brown sugar, packed
- 1 egg
- ½ cup molasses
- 2 teaspoons vanilla extract
Icing
- 2 cups powdered sugar
- 3 Tablespoons milk
- ½ teaspoon vanilla extract
Instructions
- Mix the flour, spices, baking soda and salt in a medium mixing bowl; set aside.
- In a large mixing bowl, cream butter and brown sugar together.
- Add in the egg, molasses, and vanilla extract. Cream until smooth.
- Add in half the flour mixture and mix until combined.
- Add in the remaining flour mixture and continue to mix until combine.
- Shape dough into a ball and divide in half.
- On a piece of parchment paper, pat the dough down into a 1-inch disk. Repeat with the other half of the dough.
- Refrigerate for 1-2 hours, or until cold and firm.
- Once the dough has chilled, remove it from the refrigerator and place a piece of wax paper on top. Using a rolling pin, roll dough out to ¼ inch thickness.
- Preheat oven to 350°F (180°C).
- Remove the wax paper from the top of the dough. Using cookie cutters, cut shapes into the dough. Use a spoon or butter knife to remove the extra dough from around the shapes. Roll extra dough back into a ball, and place the wax paper back on top, and roll into ¼ inch thickness. Repeat until all dough is used.
- Transfer the parchment paper with the gingerbread cookies onto a baking sheet.
- Bake for 8-10 minutes, or until the edges are firm and the centers are set. Remove from the oven and cool to room temperature.
- Make the icing: mix all ingredients in a small mixing bowl until smooth. Spoon icing into a piping bag with a small tip.
- Decorate cooled cookies with icing and, if you have them, gluten-free sprinkles or candies.
- Let the icing set for a couple of hours before storing. Store in an airtight container at room temperature for up to 4 days.
TAGS: HOLIDAY, FOR KIDS, DESSERT
Cheese Crackers
February 22, 2023You only need five ingredients to make the best ever gluten-free cheese crackers that taste like a name-brand treat! They’re exactly what a cracker should be: crunchy and salty. This recipe is provided courtesy of the Gluten-Free Palate.

Ingredients
- ¾ cup all-purpose gluten-free flour
- ¼ teaspoon xanthan gum
- 1 ½ –2 cups shredded cheddar (about 6-8 oz)
- For different flavors, use different cheeses. These photos were taken using a sharp cheddar. For a white cheddar, use white cheddar cheese.
- 4 Tablespoons butter, cold and cut into 1 inch pieces
- Extra salt for sprinkling (optional)
Instructions
- Preheat your oven to 350ºF. Line a baking sheet with parchment paper; set aside.
- In a food processor, pulse the gluten-free flour blend and xanthan gum. Add the butter pieces and cheese.
- Pulse together until it forms a ball (about 2 minutes).
- Place the ball between two pieces of wax paper, and roll it out to about ¼” to ⅛” thick.
- Using a pastry wheel or pizza cutter, cut into 1-inch shapes/squares.
- Carefully peel them and place on a parchment lined baking sheet about ½-inch apart.
- Poke each cracker with a fork to prevent over-puffing.
- Sprinkle with salt, if desired.
- Bake for 12-15 minutes or until lightly browned on the edges. Cool on the baking sheet, and store in an airtight container.
TAGS: VEGETARIAN, FOR KIDS, APPETIZERS/SNACKS
Canadian Bacon and Apple Pinwheels
January 24, 2023 These pinwheels are the perfect star of any lunch box—pack them in a bento box with fruit and carrot sticks or cucumbers for a nutritious lunch on the go. It’s also easily customizable; substitute ingredients in and out for an endless variety of tastes, or to accommodate picky eaters.
This recipe is courtesy of our friends at Jones Dairy Farm. Check the Product Finder on the Jones website to locate a store near you that carries certified gluten-free Jones Canadian bacon.

Ingredients
- 1 (6 oz) package Jones Dairy Farm Canadian Bacon, diced
- 1 cup finely shredded cheddar, or other cheese of choice
- 4 gluten-free tortillas
- 4 oz softened cream cheese
- 4 oz sour cream or Greek yogurt
- 2 Tablespoons dry ranch seasoning
- 1/2 cup apple, diced (or can substitute 1/2 cup pineapple)
Instructions
- Mix cream cheese, sour cream and ranch seasoning in a small bowl.
- Divide equally amongst 4 tortillas and spread to the edges.
- Sprinkle with Canadian bacon, cheese and apples.
- Starting on one edge, tightly roll the tortilla, pressing as you go so ingredients stay in place.
- Place on a cutting board, seam down, and place toothpicks approximately every inch.
- Slice between the toothpicks and serve.
TAGS: SIDE DISHES, LUNCH, FOR KIDS
Quesillo (Flan)
September 14, 2022
From Maria Luci, Beyond Celiac Director of Research Engagement
This recipe is from my Cuban mother, Ana, who doesn’t always love to cook but when she does she always puts a lot of love into it. She shared this and other family recipes with me when I got married. I treasure the recipe book she made me.
Gluten-Free Cuban Quesillo
Ingredients:
- 2 cans of condensed milk
- 2 cans of evaporated milk
- 8 eggs
- 8 Tablespoons sugar
- 3 Tablespoons water
- 1 Tablespoon vanilla extract
Directions:
- Preheat oven to 375°F
- In a small cookie can* make caramel by mixing the 8 Tbs of sugar with 3 Tbs of water over medium heat. Stir continuously until it turns light brown, then remove from heat.
- In a separate bowl, mix the condensed milk, evaporated milk, eggs and vanilla. Once it’s thoroughly combined, put it in the cookie can on top of the caramel.
- Cook in the oven at 375°F for about an hour, until you can get a toothpick to come out clean from the middle.
- Remove from oven and let cool.
- When the can is cool, place it in the refrigerator. Leave it there until you’re ready to serve.
- About 20 minutes before serving, boil a pot of water.
- Once boiling, hold the can carefully so the bottom is in the water. This will melt the caramel.
- Turn the can upside down over a large dish. Cut into pie slices or squares.
* Editor’s note: this is my mother’s wording, but I’ve seen her use spring form pans or flan molds like this one from Amazon (affiliate link).
Read more »TAGS: DESSERT, HOLIDAY, FOR KIDS
Pumpkin Chocolate Chip Muffins
November 2, 2021This recipe earned an honorable mention in the 2021 Beyond Celiac Gluten-Free Holiday Recipe Contest!
Recipe by Katie Blauser
Gluten-Free Pumpkin Chocolate Chip Muffins by Katie

Ingredients:
- 1 cup canned pumpkin (not pumpkin pie)
- 1/2 cup brown sugar
- 1/2 cup oil (coconut or olive)
- 2 eggs
- 2 cups Josie’s Best Muffins & More Gluten-Free Mix
- 1 teaspoon baking powder
- 1 teaspoon baking soda
- 1/4 teaspoon salt
- 2 tablespoons maple syrup
- 1/2 cup gluten-free chocolate chips
Directions:
- Preheat the oven to 350°F. Grease or line a muffin tin.
- Mix the wet ingredients together well.
- Gradually add the dry ingredients and mix until there’s no lumps. Gently stir in the chocolate chips.
- Spoon the batter into the prepared muffin tin.
- Bake for 22–24 minutes.

TAGS: THANKSGIVING, HOLIDAY, FOR KIDS, DESSERT, BREAKFAST
Pizzelles

This recipe was the grand prize winner of the 2021 Beyond Celiac Gluten-Free Holiday Recipe Contest!
Recipe by Deb Graham
Gluten-Free Pizzelles by Deb

Ingredients:
Yields 30 cookies
- 2 cups gluten-free baking mix (flour)
- 3 large eggs
- 1/3 cup granulated sugar
- 1/2 cup (1 stick) butter, melted
- 2 tablespoons gluten-free vanilla extract
- Anise pizzelles: 2 tablespoons anise extract and 2 tablespoons anise seeds
- Orange pizzelles: 2 tablespoons gluten-free orange extract (or Grand Marnier) and 2 tablespoons orange zest
- Coconut pizzelles: 2 tablespoons coconut extract and 2 tablespoons lemon or orange zest
- Chocolate orange pizzelles: add ¼ cup unsweetened cocoa powder and 2 tablespoons orange zest
Directions:
- Add the vanilla (or other flavored extract) to the melted butter and set aside.
- Whisk together the eggs and sugar in a separate bowl until well-combined.
- Add the melted butter and vanilla in a slow, steady stream while continuing to whisk until well-blended.
- Add the baking mix and various spices or seeds, orange zest, etc., and using a rubber spatula stir everything together until just combined, but don’t over mix.
- Important—let the batter sit for 10 minutes before baking. This will create a better texture.
- Drop a rounded teaspoonful of batter into the center of a pizzelle iron.* Close lid and bake for 60–75 seconds, depending on your pizzelle iron. Check for doneness often.
- Let cool on a wire rack.
TAGS: DESSERT, THANKSGIVING, HOLIDAY, FOR KIDS
Cinnamon Roll Cupcakes
November 1, 2021 Recipe courtesy of our sponsor Schär
These mouth-watering Cinnamon Roll Cupcakes will delight your friends and family. We top them with Cream Cheese Icing so they look and taste just like the classic cinnamon rolls of your dreams!

Ingredients
- 10 slices Schär Gluten-Free Artisan Baker White Bread
- 4 tbsp brown sugar
- 3 tbsp butter
- 3 tsp cinnamon
- 3 eggs
- 1 cup cream
- 2 tsp divided vanilla extract
- 2 tbsp cream cheese, softened
- 1 tbsp butter, softened
- 1/4 cup powdered sugar
Directions:
Make the Cinnamon Roll Cupcakes:
- Preheat oven to 375 degrees F.
- Grease a 12-cup nonstick muffin/cupcake pan.
- Trim crusts from bread. Arrange bread slices on large cutting board.
- Mix brown sugar and cinnamon in small bowl.
- Spread each bread slice with butter.
- Evenly sprinkle cinnamon-sugar mixture on top of buttered bread slices.
- Stack 2 bread slices together with cinnamon-sugar sides facing each other. Repeat to make a total of 5 sandwiches.
- Using a serrated knife, gently cut each bread stack into 8 to 10 strips, then cut each strip crosswise in half.
- Carefully line the muffin cups with the strips, in a circular pattern, dividing the slices evenly to fill all 12 cups.
- Place the eggs, 1 teaspoon vanilla extract and the half & half in a medium bowl. Whisk to blend.
- Use a small measuring cup to pour the egg mixture over the bread strips, dividing the mixture evenly among the muffin cups. Let rest 5 minutes.
- Bake for 25 minutes or until cupcakes spring back to the touch. Cool pan on wire rack for 3 to 5 minutes.
- Use a knife to loosen the edges of the cupcakes, and then carefully invert muffin pan to release cupcakes onto a platter.
Make the Cream Cheese Icing:
- Combine powdered sugar, cream cheese, butter and remaining 1 teaspoon vanilla extract in a small bowl. Stir until smooth.
- Spread 1 teaspoon icing evenly on top of each cupcake.
- Serve warm!
TAGS: RECIPES OF THE WEEK, HOLIDAY, FOR KIDS, DESSERT, BREADS
